

Class 1
Basic Guide to Editing Tools in Lightroom Mobile 2024
Instead of a beautiful well thought out opening paragraph, let’s just get to it. Within this guide we will focus on the main few tools that you’ll need to achieve a professional looking edit right from your mobile devices.
This guide is best viewed on the PC but is optimised for mobile devices.

Understanding your basic tools,
Quick Select : This option examines your image and enables you to automatically edit the entire image or selectively edit the subject/background using predefined presets. This feature is most effective for straightforward images that exhibit a clear contrast between the focal point and the background, providing a quick solution if you don't require a more targeted edit.
Presets : This is where you can access all the presets that were generated by Adobe as well as any third-party presets you have purchased and imported. Additionally, this is where you will find any custom presets that you have created yourself.
Crop : You can fix, resize, and modify the positioning of your image here, or you can utilise the Auto-Geometry button to automatically adjust the geometry.
Edit : This is the primary area where your editing efforts will be focused, involving selective edits and masking techniques (available in the Paid Version). This guide focus on these editing processes.
Remove : With this tool, you can remove any unwanted objects or people from your photographs. You can utilize both Generative AI and Object Detection capabilities to assist with the removal process and further refine your selections. For more intricate or delicate removals, such as dust particles or minor eye imperfections, it's recommended to turn off the Generative AI feature and manually remove these finer details. This functionality is still relatively new, and when editing on a mobile device, you may not be able to address the most intricate elements. Some trial and error may be necessary to achieve the desired results.
The Radial Gradient


Basically your best friend
This will be your most abused, I mean be your most frequently utilised during your mobile editing process. It will allow you to achieve a refined yet natural-looking edit, in contrast to the rigid edges that can result from relying solely on the "Select Subject/Background" feature.
This tool can be found in your Masking panel. Aka. Selective Edits.

By adjusting the feathering percentage, you can soften or sharpen the edges of your selections, enabling the edits to blend seamlessly with the surrounding area. While some may opt for the brush tool, believing it will yield a more precise selection, the challenge on mobile devices is maintaining control over the brush strokes to achieve a natural-looking edge. This approach may not be time-efficient or production-effective if the images are intended solely for social media purposes.
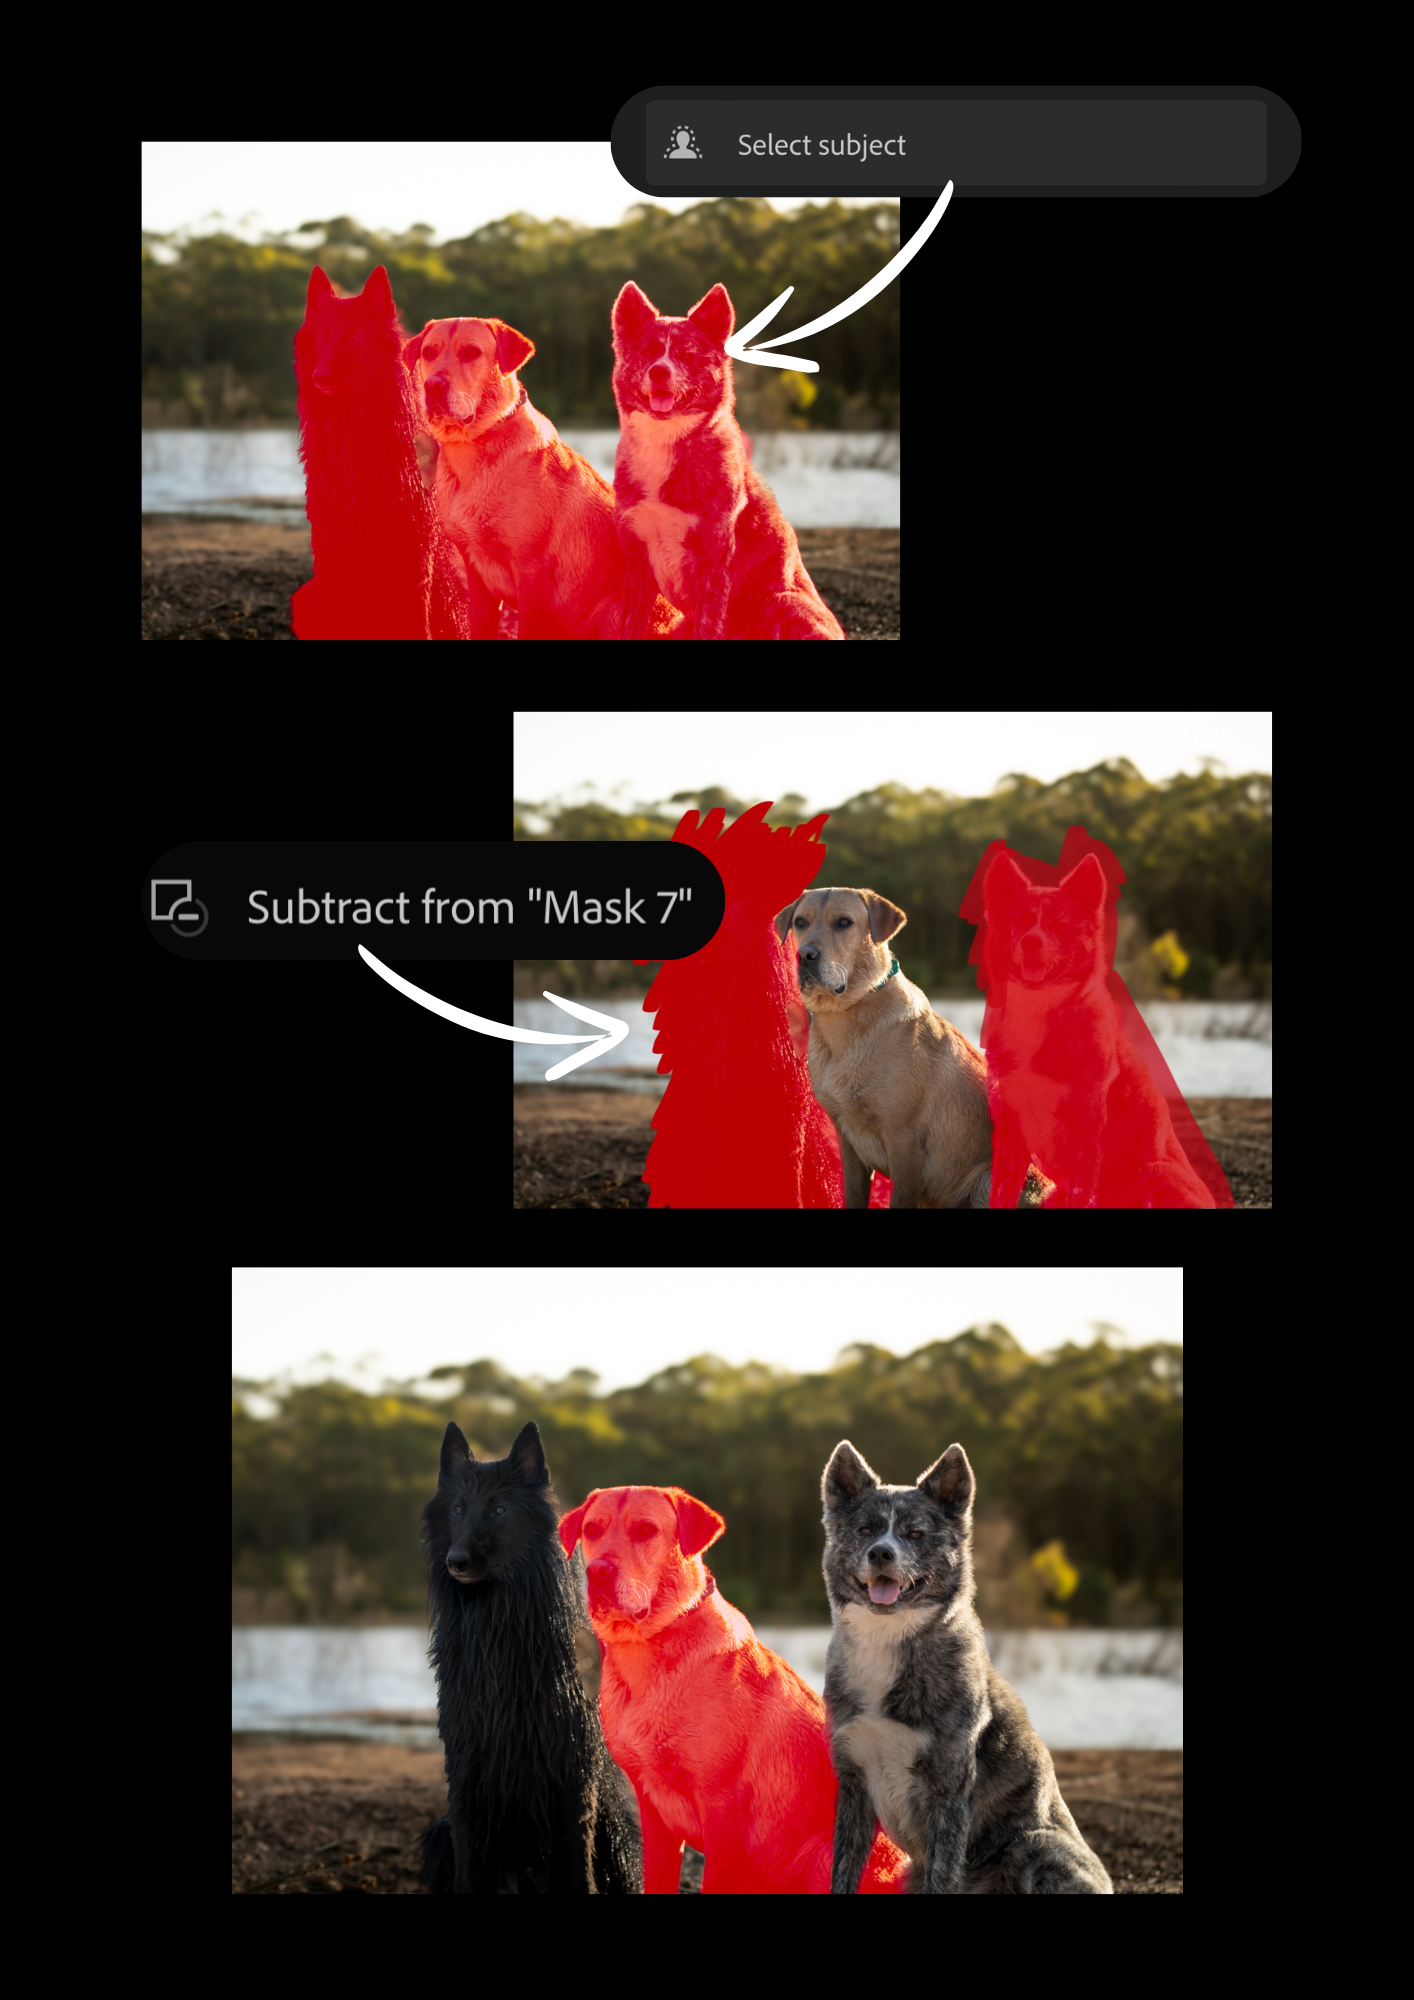
Here is an example of the differences when of using "Radial Gradient" versus "Select Subject" to address the blue tints on a grey/black dog, despite the changes being identical. Personally, I find “Select Subject” too blatant for my liking.

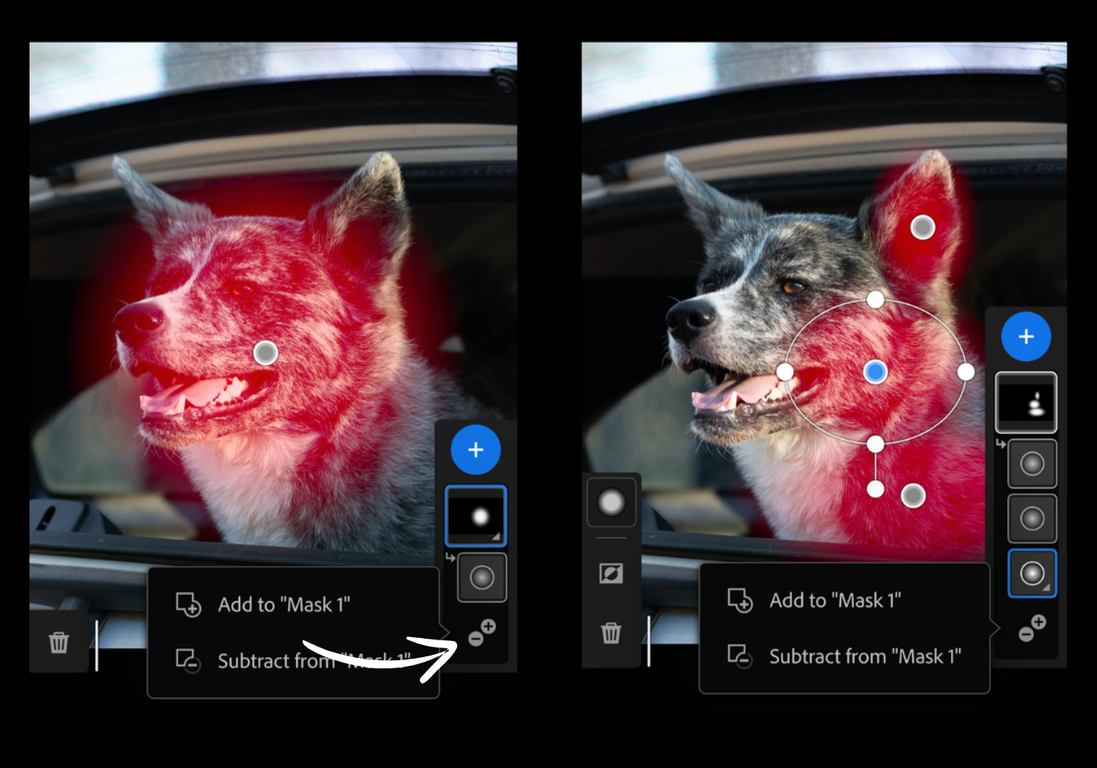
By utilizing Radical Gradient, you can create a small selection around your subject, effectively excluding areas you do not wish to modify (such as the eyes and mouth).
To add more layers to your Mask Layer, simply click on the +/- sign and select "Add to Mask". This enables you to make a collective edit as a whole with a single Mask Layer, rather than adding multiple Mask Layers.

Do I simply just hate the “Select Subject” tool?! To answer.. it’s a beneficial tool when utilised primarily to eliminate sections that are unnecessary while working with the Radical Gradient Layers. Particularly effective for enhancing exposure/shadows on an excessively shadowed subject.
Just like adding onto your mask layer, by pressing the +/- button, select subtract “Select Subject” and then invert it, allowing you to subtract the surrounding background without influencing your adjustments where you want it.
This specific technique is effective when there's a distinct contrast between your subject and background, and it decreases editing time in comparison to employing the “Brush” tool.

The majority of my personal editing process, whether on mobile or for more serious work on my computer, involves the extensive use of Radical Gradient. This single tool allows me to handle both the emphasis and the background, all the way to creating dynamic lighting effects. This, in turn, enhances the dramatic interplay between colours and thoughtful lighting.
Using an unaltered image as a reference, I've been able to generate a more dynamic lighting effect by applying just 3 Radical Gradient masks and adjusting the exposure levels. This approach has helped me place greater emphasis on the focal point of my subject. Our eyes are naturally and involuntarily drawn to areas of light, so when editing an image, it's important to consider where you want your audience's gaze to initially land. For example, in portrait photography, the face and eyes are typically the key focus, while in commercial work, the product is the primary emphasis. Once you've identified this focal point, you can then work with both Positive and Negative points of light to guide the viewer's attention.
Personally, I believe this approach is better than a simple Vignette, as it provides you with significantly greater control over your light sources.

In (Picture 1), your eyes are immediately drawn to the subject because there is nothing else in the frame to distract your attention. However, your gaze then wanders into the background and the subject's surroundings due to the lack of a clear focal point created by the lighting. In contrast, for (Picture 2) your eyes not only immediately seek out the subject, but they also linger around the details surrounding the point of light before venturing further into the scene. This natural inclination to focus on the subject and it’s immediate environment is more pronounced in the second picture.
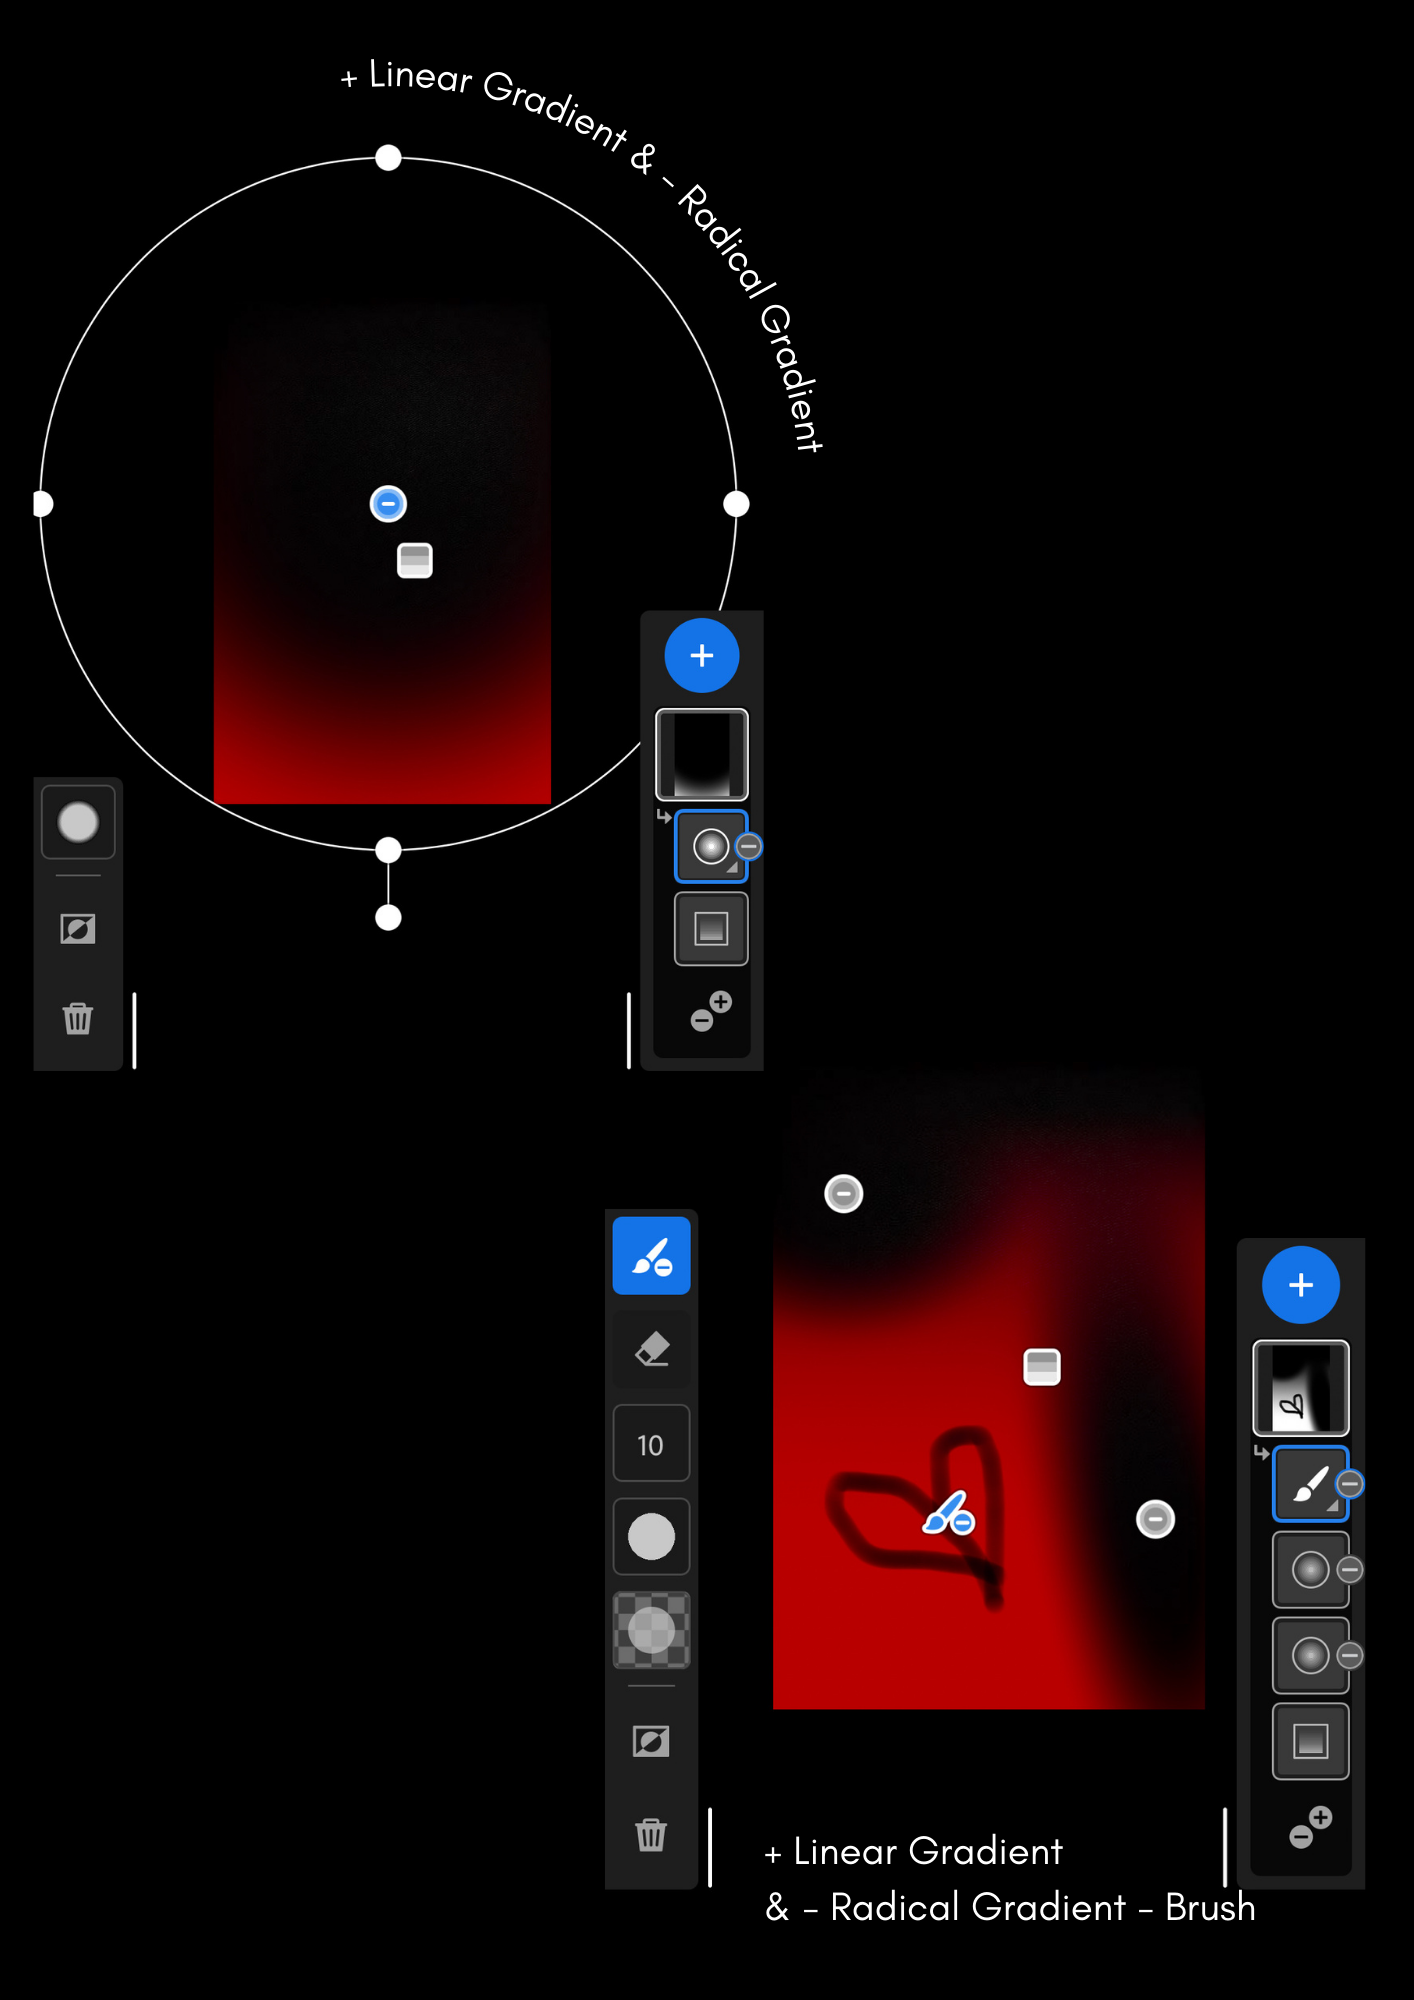
You can create different types of masking by using the same techniques for subtracting masking layers on Radical Gradients with the other tools or by combining various or multiple methods to achieve the desired outcome.
Think of your Mask Layers as Positive and Negative spaces.
The Brush Tool
The Brush Tool is another tool I frequently utilize for selective Dodging and Burning in Photoshop on my computer when working with clients. However, I don't use it as extensively when editing in Lightroom Mobile, except to employ it more like an eraser or to refine my masking selections in a more intricate manner.
However understanding the Brush Tool remains highly advantageous for those seeking to expand their technical knowledge.
Dodging: Decreases exposure to make areas lighter
Burning: Increases exposure to make areas darker

Since I have now provided sufficient information about feathering in Radical Gradients, the same principles apply when using the Brush Tool to achieve a softer, more natural blending effect.
The best way to conceptualise Flow is to think of it as a ballpoint pen where the amount of 'ink' being released from your pen is regulated. A higher Flow setting allows for a stronger, more opaque brush stroke, while a lower Flow setting produces a more translucent brush stroke.
Another way to consider this is, you're modifying the transparency of your Brush Tool, and consequently the transparency of your (targeted) edit. By manually customizing the size, feathering, and flow settings of your Brush, you can create a variety of brush masking options for your editing process, allowing you to achieve your intended result.
Examples of The Brush Tool
Using the Brush Tool to Dodge or Burn selectively.

While I often use the brush tool in Lightroom Classic to Dodge and Burn, enhancing the perception of space and depth, I typically refrain from employing this method in Lightroom Mobile. This is because Lightroom Mobile provides limited pressure control when using our stubby fingers (unless you have an iPad or a large mobile device with a stylus pen) which can make the process laborious.
Using the Brush Tool to remove selections selectively.
Colour &
Luminance Range


Colour Range Tool: Allows you to select specific regions of an image based on their colour. You can then adjust the hue, saturation, and/or brightness of those selected areas. This tool can be used to enhance certain colours by refining them automatically or manually, without affecting the undesired parts of the image.
The tool also allows you to adjust various image settings, such as Exposure, Shadows, Whites/Blacks, without impacting the other areas of the image. I find this feature particularly useful for subtly enhancing the vibrancy of flowers or to completely change a solid colour background.

Luminance Range Tool: Allows your to adjust the perceived intensity of a colour or how bright it appears when reflected off a surface (eg. light being reflected on the water) and is a crucial element of colour grading and correction.
Yellow has the highest luminance range while blue has the least luminance range among the colour wheel

By using the colour wheel to target or the bars to further refine the selection range, you’re able to adjust your Luminance values such as Shadows and Highlights in the edits panel.
Generally in Lightroom Mobile, you’ll be working on the separate masking layers of Luminance and Colour Range together to achieve the colour grading you desire of your picture.
While it might be tedious, the result is a more personalised style or to either create cinematic tone or for story telling and invoking emotions through the playful combination of colours and light.

To put it simply, the Colour Range tool selects areas based on their color, while the Luminance Range tool selects areas based on their brightness and intensity. Depending on what you're trying to adjust, you may only need to use either the Colour Range or the Luminance Range tool.
Personally, when making adjustments to solid colours, significant colour changes, or individual bodies of splattered colours in the background, I utilise the Colour Range tool. If necessary, I then further refine the selections with an additional Luminance Masking Layer. Muted or blended hues reminiscent of the sky or a sunset, expansive blank areas within the image or modifications to the lighting, I'll opt for the Luminance Range in such cases.
Notes from Jocelyn,
I trust this overview detailing the editing tools available in Lightroom Mobile's interface will prove helpful as you navigate your editing journey. In class 2, we will talk more about editing white and black dogs and tracking the common issues we face when adjusting our white balance.
As this is my first official blog post and guide, I aim to continually enhance the content and its presentation with your kind support and feedback.
If you have any questions or concerns you'd like to address, please feel free to reach out to me via email at "thegumtreestudios@gmail.com" or through my Instagram account, "@thegumtreestudios".
Thank you for all your support in the year 2024!